How to Use Custom Tiny YOLOv2 Model on Android
Note that this tutorial already assumes you have a pretrained Tiny YOLOv2 model on a custom object(s). Check out my other tutorial if you’re wondering how to do that.
Prerequisites
Note that most of this tutorial will assume you are using a Debian based linux distribution such
as Ubuntu or Linux Mint. For RPM based distros, the commands will be very similar. Simply
look up the packages and many times it’s just a matter of using yum or dnf instead of apt-get.
Unfortunately, I don’t do any development on Windows or Mac so I am unformiliar with how the process would work on those platforms. Feel free to leave your advice to those users.
Build Tools
We’ll need these libraries to compile others from source.
  sudo apt-get update
  sudo apt-get install build-essential software-properties-common pkg-config cmake
Android Studio
Here is a link that explains the install process for Android Studio on Ubuntu 16.04:
https://linuxconfig.org/how-to-install-android-studio-on-ubuntu-16-04-xenial-xerus-linux
Since Google only releases .zip packages for linux, the install process should be similar across distros.
Python, Pip, and VirtualEnvWrapper (Recommended)
On Ubuntu, installing python and pip is quite easy.
sudo apt-get install python3 python3-setuptools python3-pip
Next, you’ll want virtualenvwrapper to make separation of python environments easier.
sudo pip3 install virtualenvwrapper
Add the following lines to ~/.bashrc:
export WORKON_HOME="$HOME/.virtualenvs"
source $HOME/bin/virtualenvwrapper_bashrc
Run source ~/.bashrc to activate virtualenvwrapper
Now you can create virtual enviroments with mkvirtualenv, enter them with workon, and close them using deactivate.
Darkflow
Note: (Optional) Before installing darkflow, you can jump in a virtualenv to separate the darkflow packages and configuration
from your other python environments: mkvirtualenv darkflow
First, clone the repo into a directory where you would like to install darkflow.
Next, clone the repo:
git clone https://github.com/thtrieu/darkflow.git
Once cloned, you have three options to install darkflow as detailed from the repo readme:
- Just build the Cython extensions in place. NOTE: If installing this way you will have to use
./flowin the cloned darkflow directory instead offlowas darkflow is not installed globally.python3 setup.py build_ext --inplace - Let pip install darkflow globally in dev mode (still globally accessible, but changes to the code immediately take effect)
pip install -e . - Install with pip globally
pip install .
Congratulations! You’re now all set to convert the darknet model
Convert Model
First, copy your final weights file to the bin folder within the darkflow folder.
Next, copy your tiny yolo configuration file to the cfg folder.
Finally, to convert the weights to a *.pb file, run the command:
flow --model cfg/tiny-yolo-obj.cfg --load bin/tiny-yolo-obj.weights --savepb
replacing the --model and --load arguments with your applicable filenames.
The converted weights *.pb file will be available in the built_graph folder.
Note:
There is currently a bug in darkflow where you will run into a python runtime error that says the model is the incorrect size or is off by a certain amount of bytes.
To fix this, change the value of the variable self.offset on line 121 of darkflow/utils/loader.py to the amount of bytes the error says you are off by.
Modify Android Code
Fortunately for us, the team behind tensorflow includes an Android App demo that we can use to test our model. Unfortunately, the example app is burried in the tensorflow code.
If you clone the tensorflow repo, you’ll find the example app in tensorflow/examples/android.
To get started, simply open that folder up in Android Studio. Initially, you will likely have to click through a bunch of updates to the project recommended by Android Studio.
By default, this project comes with four activities: Classifier, Detector, Stylize, and Speech. If you only want the Detector activity to install,
simply comment out the other activity configurations in AndroidManifest.xml:
- Lines 37-44 to comment out Classifer
- Lines 55-71 to comment out Stylize and Speech
Next, in order for the app to be able to use your model, you need to copy your converted weights *.pb file from the
built_graphto the assets folder in Android Studio.
To enable the custom model, you’ll want to change some configuration values in two files. I provide the values that I used.
java/org/tensorflow/demo/DetectorActivity.java
- On line 74, change the value of
YOLO_MODEL_FILEto reflect the name of your *.pb file in theassetsfolder.private static final String YOLO_MODEL_FILE = "file:///android_asset/tiny-yolo-obj.pb"; - On line 86, change the value of
MODEtoDetectorMode.YOLOprivate static final DetectorMode MODE = DetectorMode.YOLO; - (Optional) On line 91, lower the minimum confidence if you want bounding boxes to display at lower confidence levels.
private static final float MINIMUM_CONFIDENCE_YOLO = 0.05f;
java/org/tensorflow/demo/TensorFlowYoloDetector.java
- On line 37, change
NUM_CLASSESto reflect how many classes you trained your model on.private static final int NUM_CLASSES = 1; - On line 51, change the
LABELSarray to only contain the labels of the classes you trained. The names should be in same order in which they appeared in the*.namesfiles you used to train the model with darknet.private static final String[] LABELS = { "exitsign" };
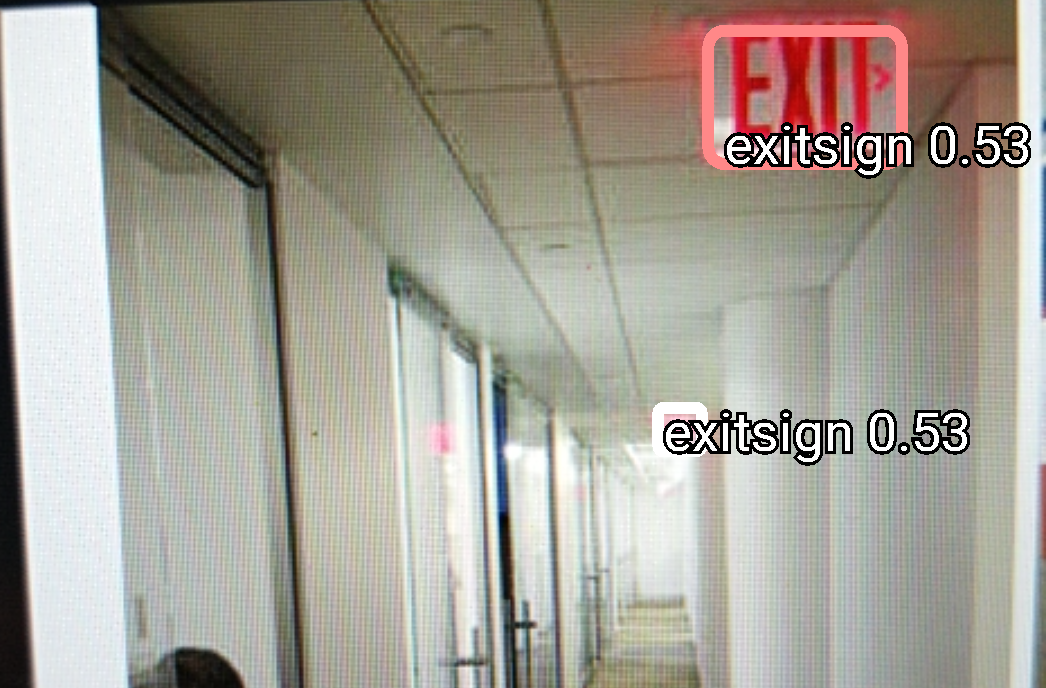
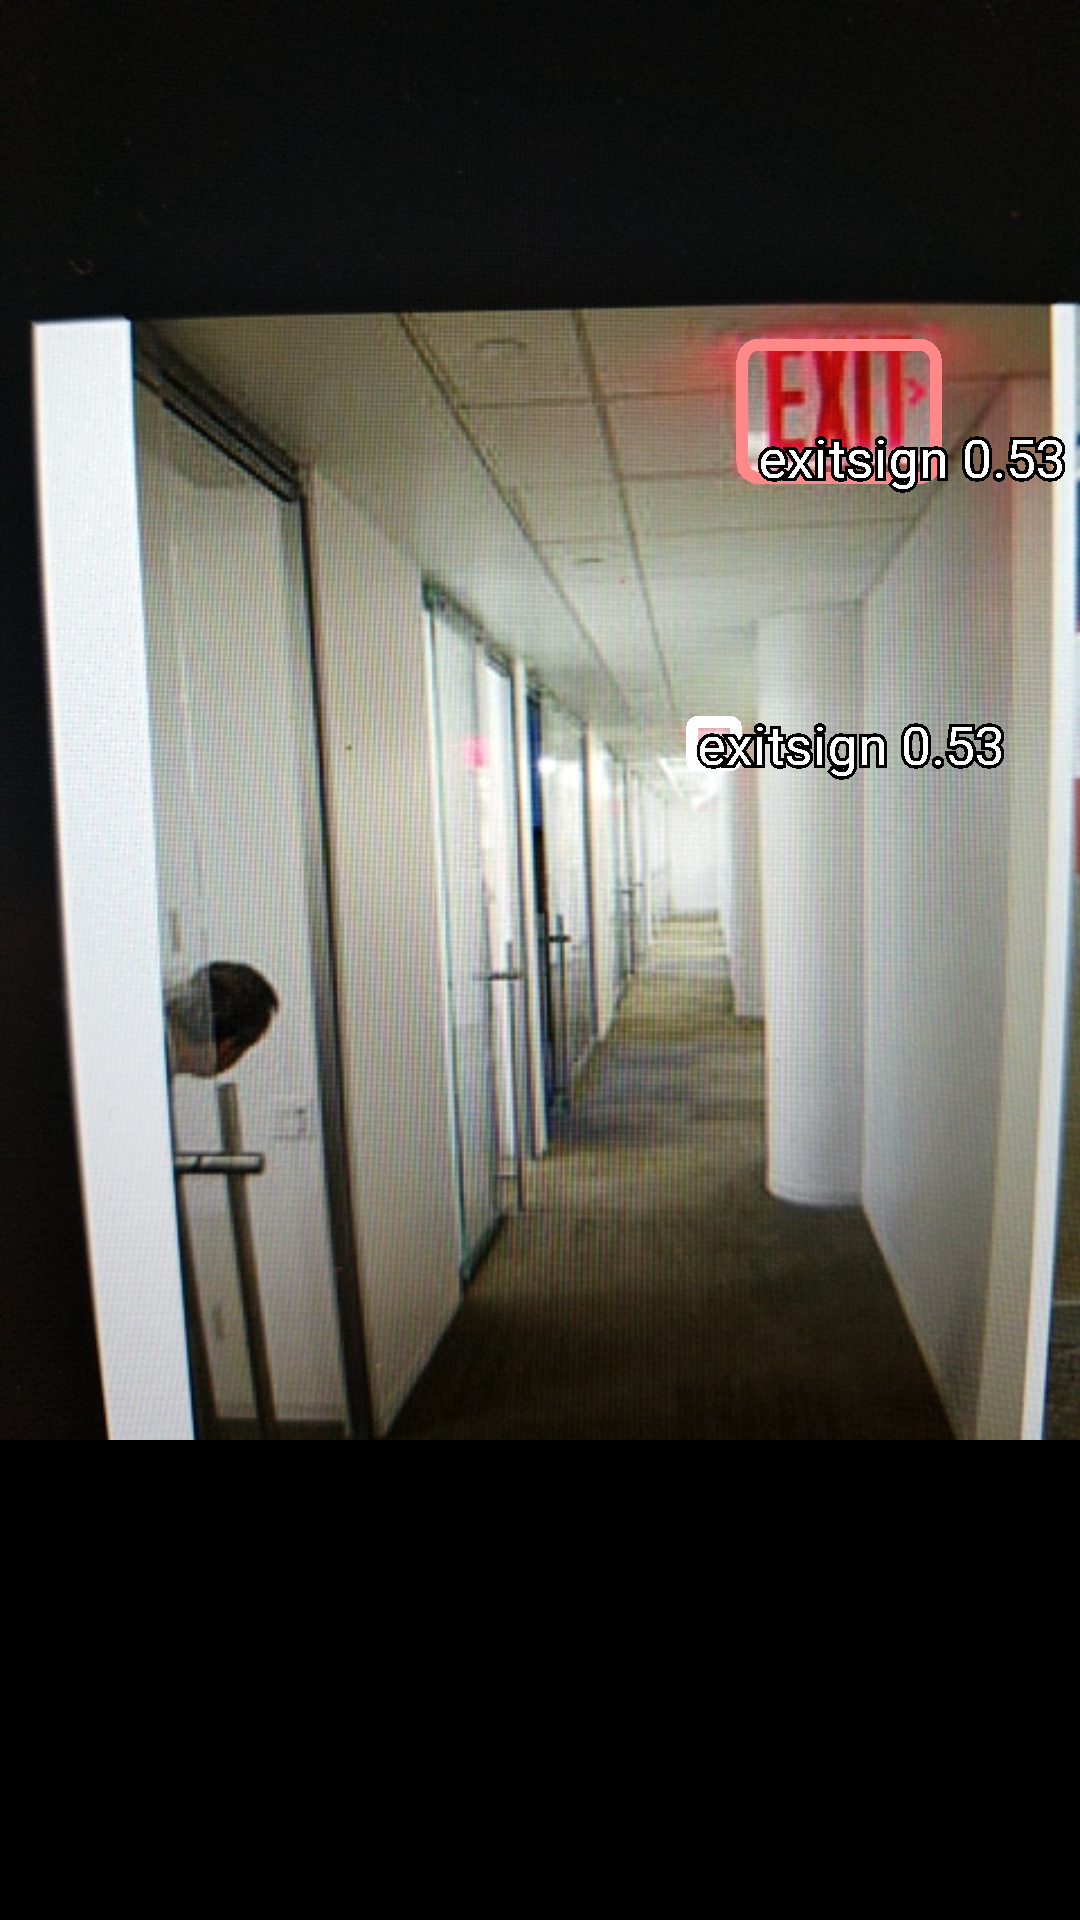
Results
I trained my model on emergency exit signs and here is a screenshot of it running on a Samsung Galaxy S7!
Conclusion
I am by no means an expert on Android Development or Image Detection but I hope this tutorial can serve as a jump start to help you create an awesome android app using YOLOv2 image detection.
Like always, corrections, suggestions or comments are always welcome!