
Training YOLOv2 using Custom Images
Prerequisites
Note that most of this tutorial will assume you are using a Debian based linux distribution such
as Ubuntu or Linux Mint. For RPM based distros, the commands will be very similar. Simply
look up the packages and many times it’s just a matter of using yum or dnf instead of apt-get.
Unfortunately, I don’t do any development on Windows or Mac so I am unformiliar with how the process would work on those platforms. Feel free to leave your advice for those users.
Build Tools
We’ll need these libraries to compile others from source.
  sudo apt-get update
  sudo apt-get install build-essential software-properties-common pkg-config cmake
OpenCV
This library will be essential for viewing and manipulating images.
Prerequisites
  sudo apt-get install python-dev python-numpy libtbb2 libtbb-dev libjpeg-dev libpng-dev libtiff-dev libjasper-dev libdc1394-22-dev
  sudo apt-get install libavcodec-dev libavformat-dev libswscale-dev libv4l-dev
  sudo apt-get install libxvidcore-dev libx264-dev
  sudo apt-get install libgtk-3-dev
  sudo apt-get install libatlas-base-dev gfortran
  sudo apt-get install python2.7-dev python3.5-dev
Installation from a PPA
sudo apt-get install opencv* libopencv-dev python-opencv
Advanced Installation
The installation steps above might not be for everyone and there are a lot more flexible ways of installing OpenCV. Below I’ve included some links for installing from source.
- Install OpenCV on Ubuntu or Debian
- Installing OpenCV 3.2.0 on Fedora 25
- macOS: Install OpenCV 3 and Python 3.5
Disclaimer: I have only personally followed the steps for the Fedora 25 installation from source. I don’t own a Mac and therefore cannot test that specific installation process. As for Ubuntu, I usually install from the PPA.
CUDA (Optional)
This step is only applicable if you have an Nvidia GPU. If not, you can skip to the Darknet installation.
For those that don’t know, here is Nvidia’s description of CUDA:
CUDA® is a parallel computing platform and programming model developed by NVIDIA for general computing on graphical processing units (GPUs). With CUDA, developers are able to dramatically speed up computing applications by harnessing the power of GPUs.
In my experience, they aren’t overselling it. By installing CUDA, you will greatly decrease your training times. Even more fortunately, unlike their linux drivers, Nvidia actually makes CUDA very easy to install. Head over to the cuda downloads page and follow the instructions. For the path of least resistance, choose the precompiled binaries (.deb, .rpm, etc…).
cuDNN (Optional)
This step is also only applicable if you have an Nvidia GPU.
Again, for anyone interested, here is Nvidia’s explanation of cuDNN:
The NVIDIA CUDA® Deep Neural Network library (cuDNN) is a GPU-accelerated library of primitives for deep neural networks.
Like CUDA, this library will greatly improve the speed of your training. The installation process is only
slightly harder than the CUDA one. Head over to the cudnn download page
and sign up to be a member. Once you finish their survey and agree to the terms, you will be presented with
a large list of cuDNN versions to choose from. The versions closer to the top are the most up-to-date ones
however you want to choose the version that corresponds to your CUDA version. To check you installed CUDA version,
run nvcc --version from the command line.
On Ubuntu, I suggest installing the Runtime and Developer libraries. If you’re on another platform, Nvidia provides a very detailed installation guide which should be the second item in the list that appeared after choosing your cuDNN version.
Darknet
Alright, time for the fun part! If you’ve successfully completed the steps so far, this step will be a piece of cake.
- Open the terminal and navigate to the folder where you would like to install darknet
- Clone the repo:
git clone https://github.com/pjreddie/darknet - Enter the repo folder:
cd darknet - Edit the Makefile
- On line 3: change
OPENCV=0toOPENCV=1 - If you installed CUDA and cuDNN:
- On line 1: change
GPU=0toGPU=1 - On line 2: change
CUDNN=0toCUDNN=1
- On line 1: change
- On line 3: change
- Build the source:
make
Congratulations! You’re now ready to start collecting your data.
Data Collection
Since we are training a computer vision model, a lot of data is required. Generally, at least 300 images per class are required but I would try to shoot for something in the 500 to 1000 range if you’re expecting a refined model.
If your object is common enough, scraping Google Images might yield enough good images to train on.
Another great strategy is to take videos of the objects you need to detect. This will quickly and efficiently generate a large amount of usable images. Then, using a tool like VLC, you can extract frames as images from the video at a given interval.
Manual Data Labeling
There are a few options available for labeling data in the format that YOLO requires, but I have had the best luck with Yolo_mark.
The installation on linux is quite simple:
git clone https://github.com/AlexeyAB/Yolo_mark.git
cd Yolo_mark
cmake .
make
Before running the program, you’re going to want to change some configuration settings. From the README:
- Delete all files from directory
x64/Release/data/img - Put your .jpg-images to this directory
x64/Release/data/img - Change number of classes (objects for detection) in file
x64/Release/data/obj.data - Put names of objects, one for each line in file
x64/Release/data/obj.names
Now that you’re ready to go, run ./linux_mark.sh to start Yolo_mark. The UI is relatively intuitive and
it should be easy to start labeling your classes.
Assemble Data and Configuration Files
From what I have experienced, Darknet is very particular about where you put your files so follow closely.
Move Data and Config Files
- In
x64/Release/data/img, you should have all of your images and an accompanying.txtfile. Copy all those files to/path/to/darknet/data/img. - In
x64/Release/data, you should havetrain.txt,obj.names, andobj.data. Copy those files to/path/to/darknet/data. - In
x64/Release, you should haveyolo-obj.cfg. Copy that file to/path/to/darknet
Modify Config Files
At this point, you can choose which version of YOLO you want to train. There are two options: Regular and Tiny. According to the Darknet site, the regular network runs at ~40 FPS on a Titan X whereas the tiny network runs at ~200 FPS. The tiny network simply sacrifices accuracy for speed. Unless you plan on using your model on a mobile or embedded device, the regular network should be fine.
Regular YOLO
- Set number of classes you’re training on line 230 of
yolo-obj.cfg - Set
filtervalue equal to(classes + 5)*5on line 224 ofyolo-obj.cfg
Tiny YOLO
- Copy
tiny-yolo-voc.cfgfrom/path/to/darknet/cfgand rename it totiny-yolo-obj.cfg - Set number of classes you’re training on line 120 of
tiny-yolo-obj.cfg - Set
filtervalue equal to(classes + 5)*5on line 114 oftiny-yolo-obj.cfg
Alright, let’s start training!
Training
Download the pre-trained weights: wget http://pjreddie.com/media/files/darknet19_448.conv.23
Start Training!
# Regular
./darknet detector train data/obj.data yolo-obj.cfg darknet19_448.conv.23

# Tiny
./darknet detector train data/obj.data tiny-yolo-obj.cfg darknet19_448.conv.23
When to stop training
I want to credit this article for this information. I simply changed some wording for easier understanding.
AlexeyAB has a very informative description explaining when you should stop training the model. The average loss (error) value (marked bold in the line below) that gets reported after every training iteration should be as low as possible.
2: 2.950644, 15.939886 avg, 0.001000 rate, 2.813000 seconds, 128 images
The YOLOv2 is configured so that weights of the model are saved into the backup folder every 100, 200, 300, 400, 500 and eventually every multiple of 1000 iterations. If training ever were to be interrupted, you can continue training from the last saved .weights file like so:
./darknet detector train data/obj.data data/yolo-obj.cfg backup/yolo-obj_2000.weights
Results
To test your model, you’ll want to slightly modify your config file.
- Change
batchto 1 on line 2 ofyolo-obj.cfgortiny-yolo-obj.cfg - Change
subdivisionsto 1 on line 3 ofyolo-obj.cfgortiny-yolo-obj.cfg
Run a prediction
# Regular
./darknet detect data/yolo-obj.cfg backup/yolo-obj_<iteration>.weights /path/to/test/image.png

# Tiny
./darknet detect data/tiny-yolo-obj.cfg backup/yolo-obj_<iteration>.weights /path/to/test/image.png
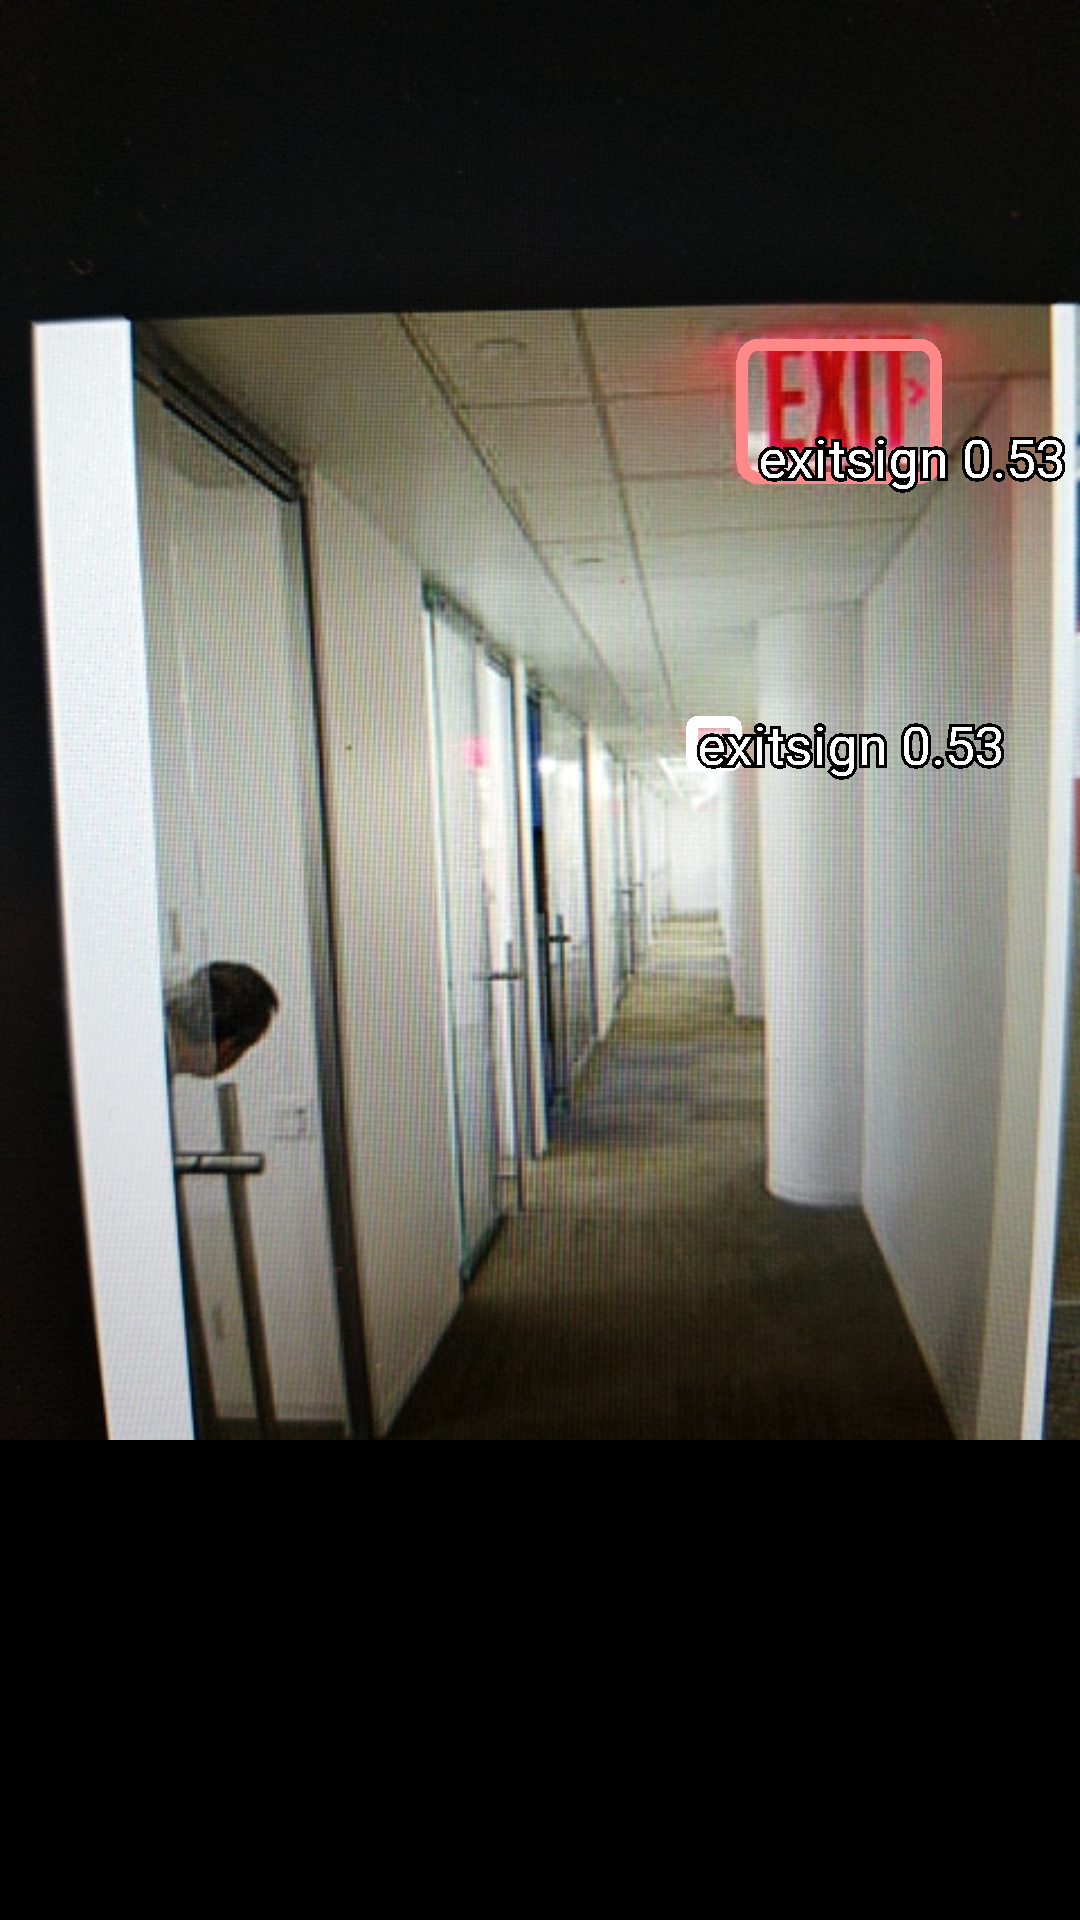
I trained my model on emergency exit signs and here is a screenshot of it running on a Samsung Galaxy S7!
Conclusion
In reality, training YOLOv2 using custom data is quite easy but the information describing the process is hard to come by. I hope this tutorial was helpful and perhaps saved you some time while figuring out how to train your own model.
Like always, corrections, suggestions or comments are always welcome!